Adding A Music Product to the Market

Overview: This tutorial will provide all the steps needed to add a music product on The Market.  Most of the steps are identical for posting any downloadable product on The Market.  The audio files to be delivered upon purchase are linked using the same tool as any other digital file.  The overview of that process can be found on step 7.  If you are familiar with adding the products, you may wish to use this link to jump to the area that specifically relates to adding a music listing.

Preparing the Files: The music listing assumes that you have a full version of the music file and a preview version.  The final version should be stored on a remote server.  If you do not have one available to you, we can upload your files to our remote server and provide you links.  The preview files should be about 30 seconds in length.  Unless you are selling dozens of sound files, the preview files can be included in our server.  Our system does not provide a watermark or copyright notice.  If that is desired, you will need to add them to the files manually.

Album Art: Our system will use the featured image as an album cover for the storefront when possible.  However, it is best to embed the album art in the file.  Check out this helpful tutorial on embedding the album art at: https://www.cinchsolution.com/add-album-art-to-mp3/

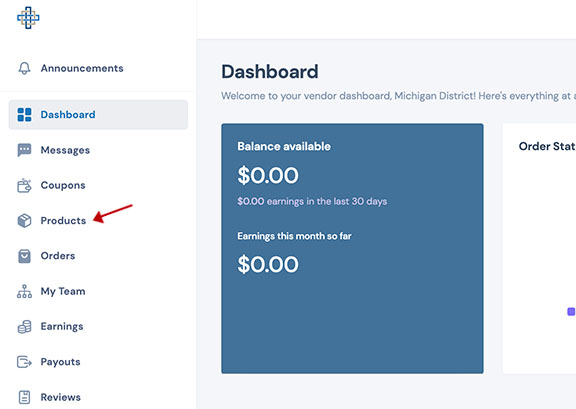
Step 1: Select the Products tab on the left side bar of the Vendor Dashboard.

(click to zoom)

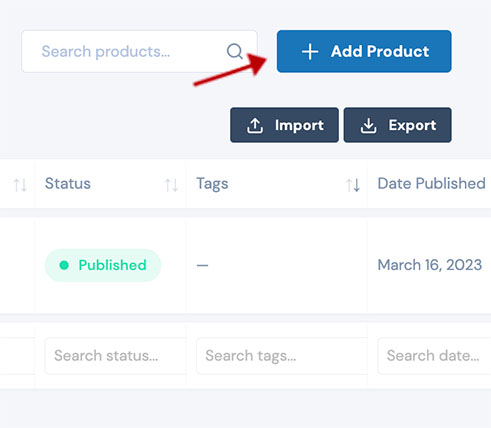
Step 2: Select the "Add Products" button on the upper right corner of the Vendor Dashboard.

(click to zoom)

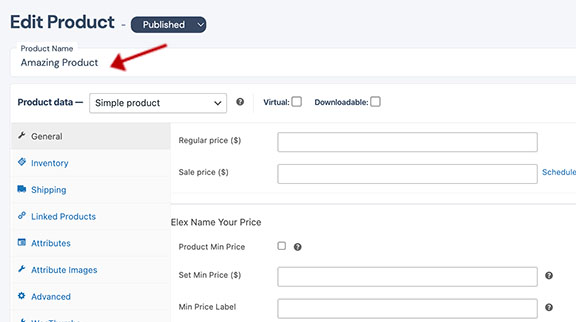
Step 3: Give your product a name. Note that you may find it difficult to get the curser to allow you to enter text in the box.  On some browsers you have to click on the blank space after the phrase "Product Name."

(click to zoom)

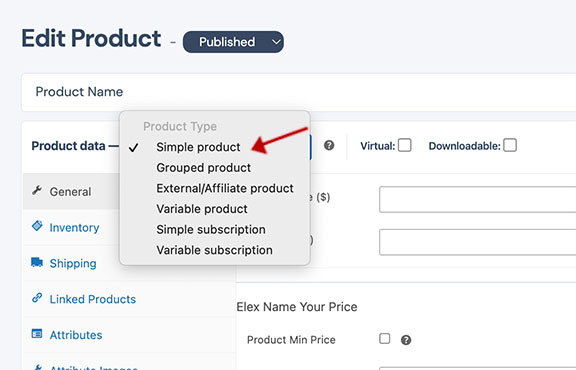
Step 4: For this tutorial you will select the "Simple Product" option from the dropdown "Product Type" menu.  See the Product Overview tutorial for descriptions of the various product types.

(click to zoom)

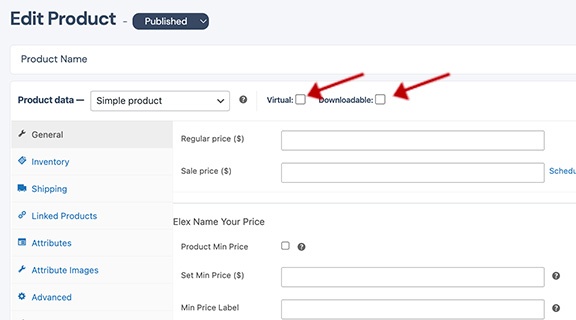
Step 5: Select either "virtual" or "Downloadable" if your product is not a physical product that is to be shipped.  As a reminder, virtual products are links to downloads or password information that unlocks features; downloadable are products that the buyer will download.

(click to zoom)

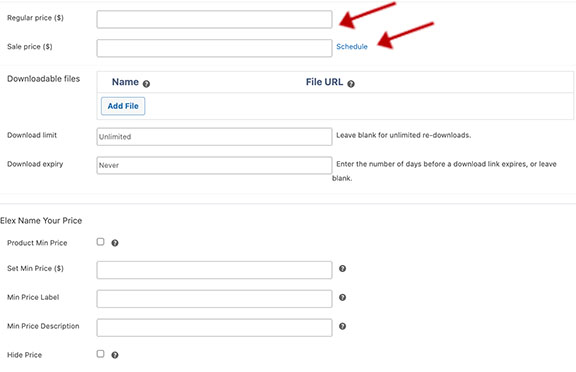
Step 6: Enter the price and a sale price if the item will be going on sale.  Notice that you can schedule the sale price to switch on and off on your product.  Leave these field blank if you are going to allow the customer to set the price.

(click to zoom)

Name Your Price Option

The name your price option allows the seller to offer the customer the option to name their price for a specific product.  In addition to being a useful option for promoting customer engagement, the name your price tool can be used to create a donation item.  The donation item can be included as an "add-on" to the selected product.  That process is covered in a different tutorial.

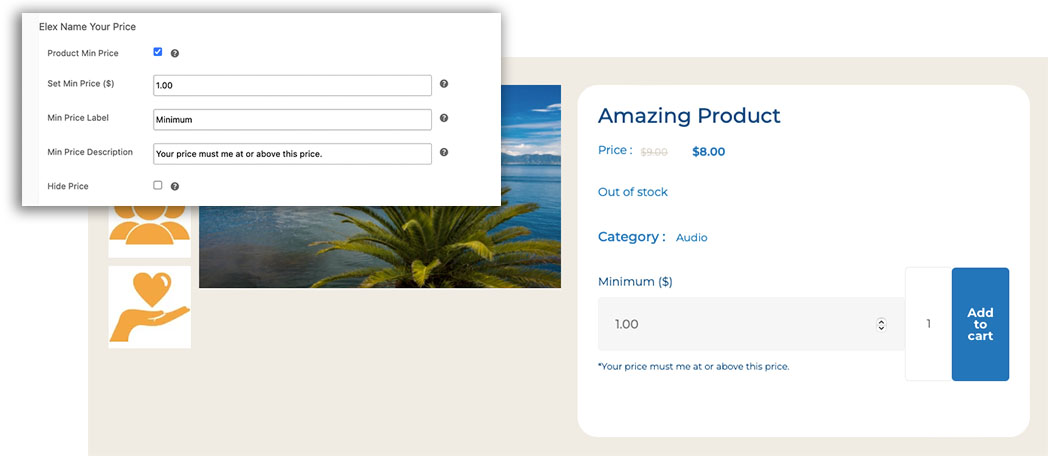
Step 1- The Product Min Price must be checked for the name your price to be displayed on the product listing.

Step 2- Set the minimum price that you will accept for the product.  Leave this field blank if you will accept an offer of $0.00.

Step 3- Set the Label that will appear on the Listing.

Step 4- Use one short line to describe the minimum price.  In the sample, we used, "Your price must be at or above the minimum price."

Step 5- Determine if you want to hide the normal price you set in Step 6.

The Output will look like the inset image to the right.
(click to zoom)

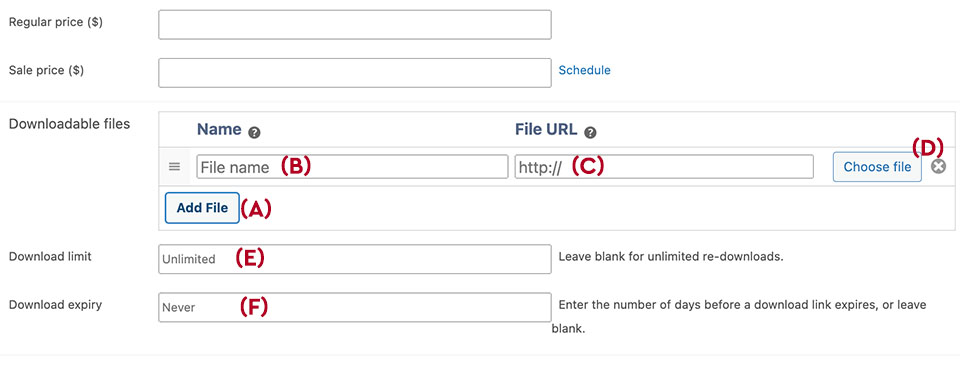
Step 7: If you selected "Downloadable Item" you will need to select the "Add File" (A) button and provide a name for the file (B) and the file URL(C).  If the file is going to be distributed through the site, you will Select the "Choose File" (D) option to upload and select the file using the same process as you have been using to upload and select images.  Once the file is selected, the name (B) and URL (C) will be entered for you.  There are some file size limitations on the server, so large files should be linked from other file sources like Dropbox.  If you cannot get a large file to load, contact us to discuss other storage options that are available for such an issue.

Finally, determine how many times a buyer can download the file (E) and for how long the file will be available. (F)

(click to zoom)

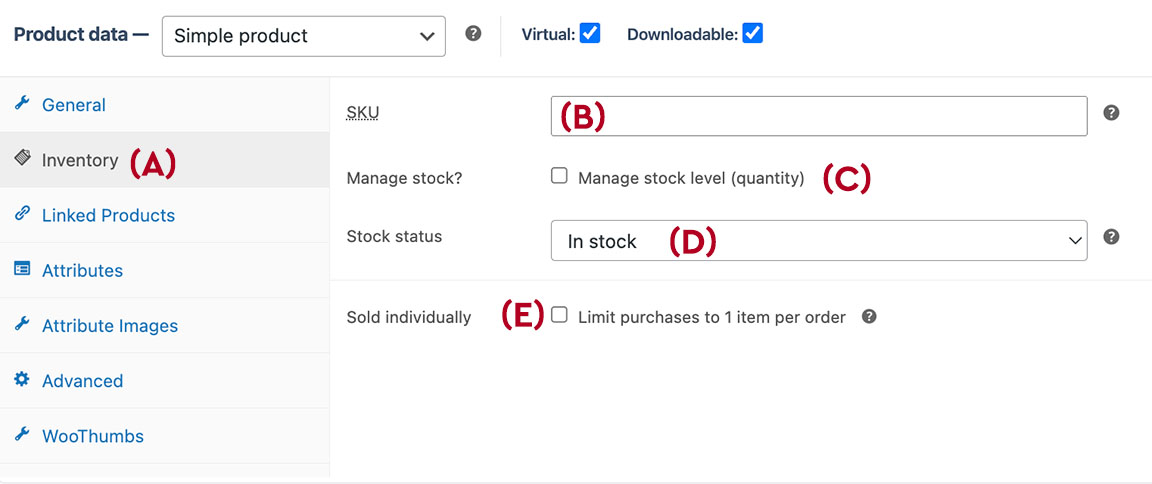
Step 8: Select the "Inventory" (A) tab on the lefthand side of the add product tool.  Enter a SKU (B).  A SKU is a unique identifier.  It is best to create something with a combination of letters and numbers.  For example, if the product is part of the Square Publishing, it will have a SKU that looks like this: SP23201.

Check the "Manage Stock" (C) option if you would like the system to alert you when the inventory is low.  When the inventory is low and the box is checked, customers will see a low inventory alert.

Mark the stock status (D) using the dropdown box.

Check the box (E) if you will only allow one purchase per customer.

(click to zoom)

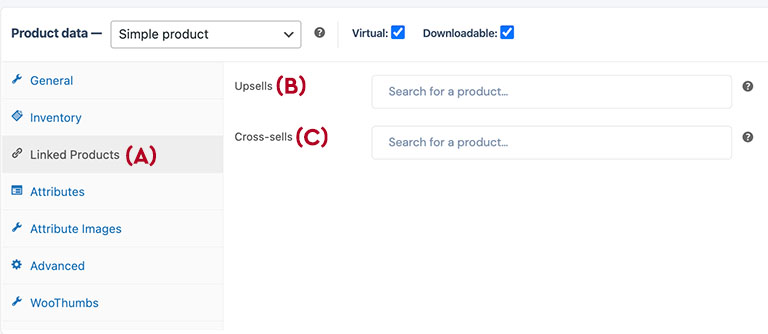
Step 9: Select the "Linked Products" (A) tab on the lefthand side of the add product tool if you would like to pair the product with other products.  The products can belong to your shop or another person's shop.  Upsells (B) are products that offer better or more features than the current product.  It would most often be used when there are variations within a product.  "Cross-sells (C) are related products.  Simply start typing the name of a product and the search tool will offer suggestions.  In the event of heavy server loads the response time when typing can be slow.  Please be patient.

(click to zoom)

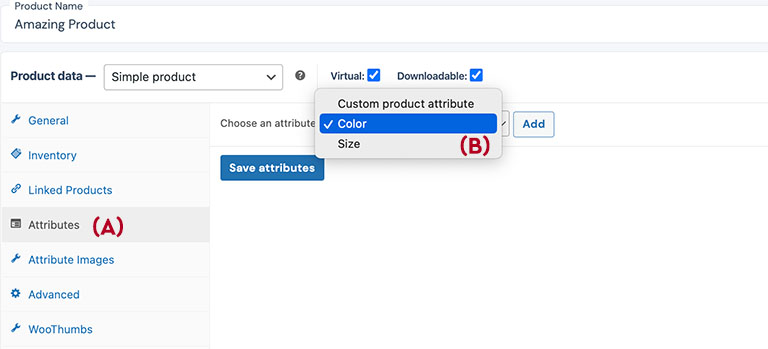
Step 10: Select the "Attributes (A) tab on the lefthand side of the add product tool if you would like to add searchable attributes to products with variations.  An example of a product with variation would be shoes that come in different sizes and different colors.  By setting attributes to the product, you will enable a shopper to find a blue shoe in their size.  The "Choose and Attribute" dropdown (B) menu currently includes two built-in attributes and an option to add your own custom attribute.  After you've made your selection you will choose the "Add" button.

(click to zoom)

Step 11: If you choose one of the store-wide attributes, you will need to select which of the specific attributes would apply to your product.  There are over a dozen different colors assigned to the color attribute, your product may only come in two colors.  You would use the attribute picker (B) to select the attributes that are appropriate for your product.  In the windows to the right, the "Color" attribute was selected.  The second image shows the dropdown list that appears when you click in the "Select Terms" box(C).  You can select the colors you would like for your product.

Select the option for "Visible on the product page" if you would like to have the attributes shown on the product page.  Note that you can use the "Select all" option to select all the attributes.

Note: If you don't see the attribute selector, click on the attribute name that appears below the "Choose an attribute" tool.

Also note: you can have multiple attributes.

(click to zoom)
(Click to Zoom)

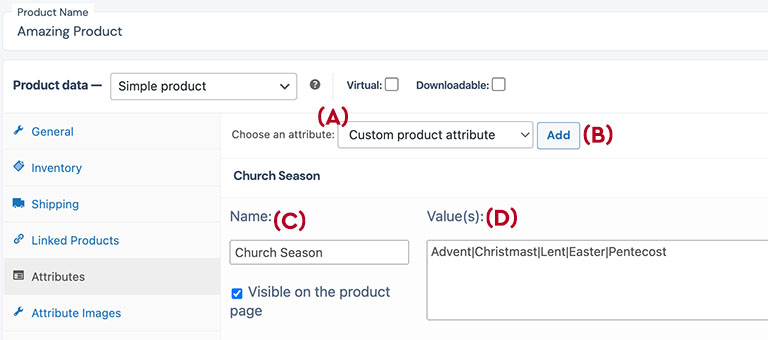
Step 11b: If you would like to create a custom list of variations select the "Custom Product Attribute" in the dropdown list (A).  After you select the "Add" button (B) you will see a tool open.  Add the name of your attribute list in Name field (C).  In the Value field (D) you will add the variables to the attribute list.  Use the separator "|" symbol to divide the variables.  In the sample list I am adding a product attribute "Church Year" with the variables, "Advent|Christmas|Lent|Easter|Pentecost."

(click to zoom)

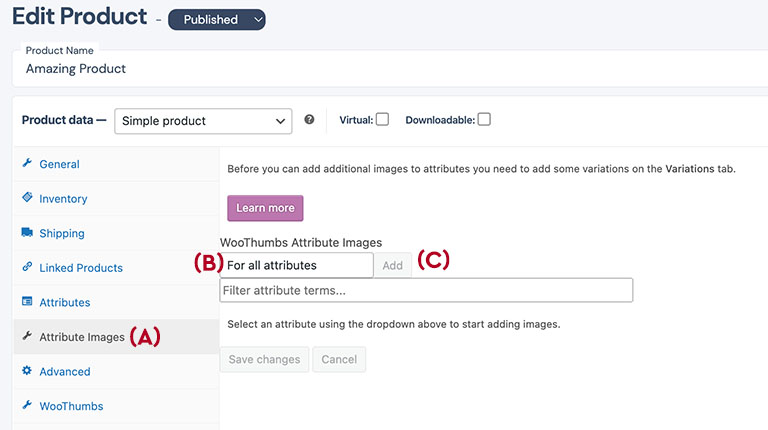
Step 11c: If you created a custom attribute list in the previous steps, you can use the "Attribute Images" tab (A) to attach and image to your specific products.  For example if you sell clothes in various colors you can take images of a shirt and upload each color to appropriate color name.  In the image on the right, we did not create a new attribute, so we cannot attach images.  If you were to do so, select the proper attribute from the dropdown list (B) and select "Add" (C).  Use the media tool to upload the image.

(click to zoom)

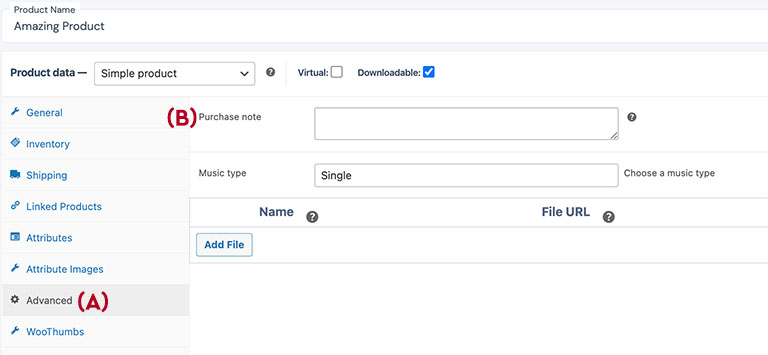
Step 12: The Advanced tab (A) currently is used to gather purchase notes for your.  The audio files function is not used in the location at the time.

(click to zoom)

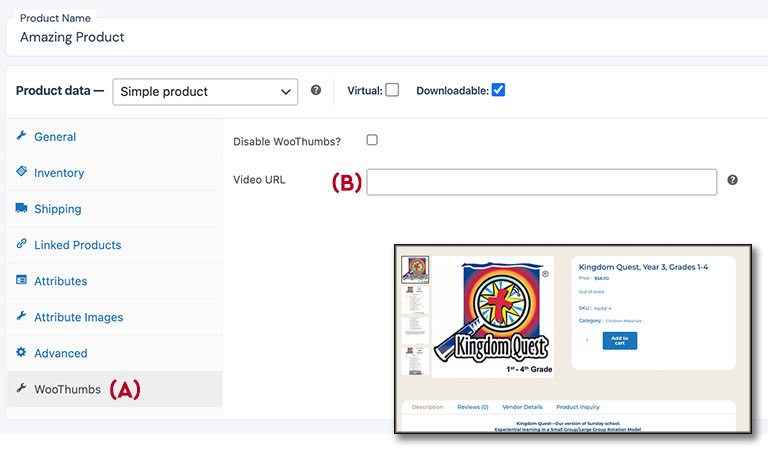
Step 13: The WooThumbs (A) tab allows you to add a video to your product image gallery.  The image gallery sample is shown in the inset below the product builder.  The image gallery for a product listing will have one or more images.  With the WooThumbs tool, the Main product image will be replaced with a video.  Please note that the video will only play in the single product listing.  I will show you in step 14 how to add a video to the thumbnail images.  For this step, if you want to add a video to the feature image, paste the video URL (Web address) in the "Video URL" field (B).  The video can be linked to most video hosting sites including Facebook, YouTube, and Vimeo.  The most effective videos are no more than 3 minutes in length.

(click to zoom)

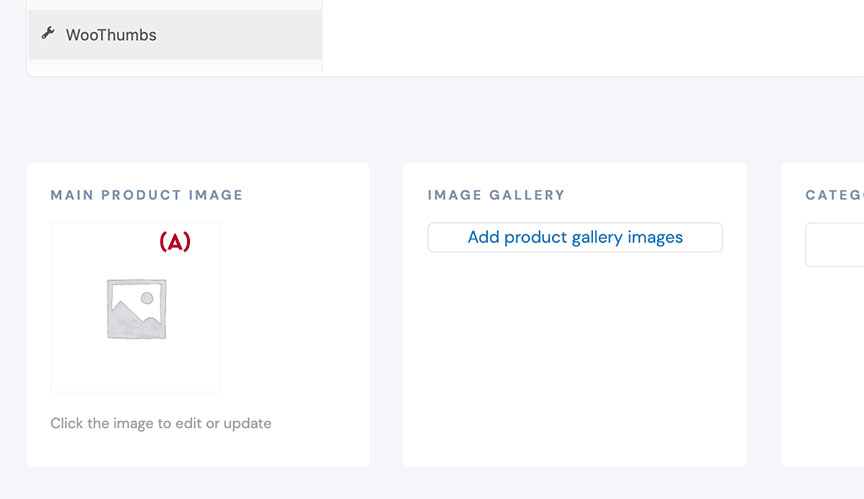
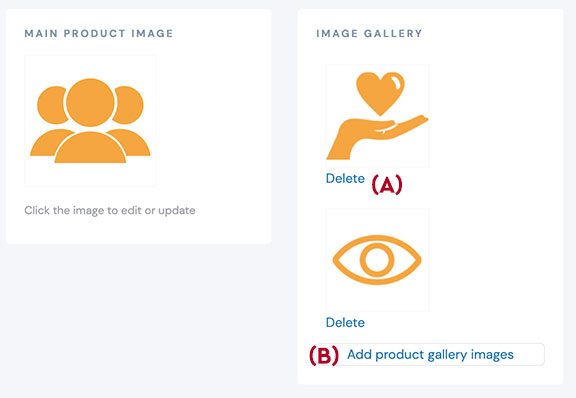
Step 14a: The "Main Product Image" (A) is the image that appears first on the product listing and is the image that appears on the store front.  To add the product image, select the middle of the "Main Product Image" box and a pop-up selector will open.

(click to zoom)

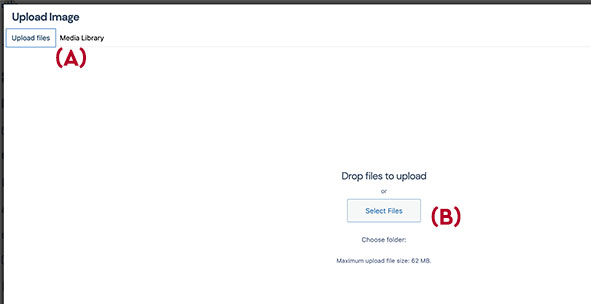
Step 14b: Select the "Upload Files" tab (A)  on the window that popped-up when you selected the middle of the main product image square.  Either drag and drop or use the select files button (B) to add the image to your media manager.

(click to zoom)

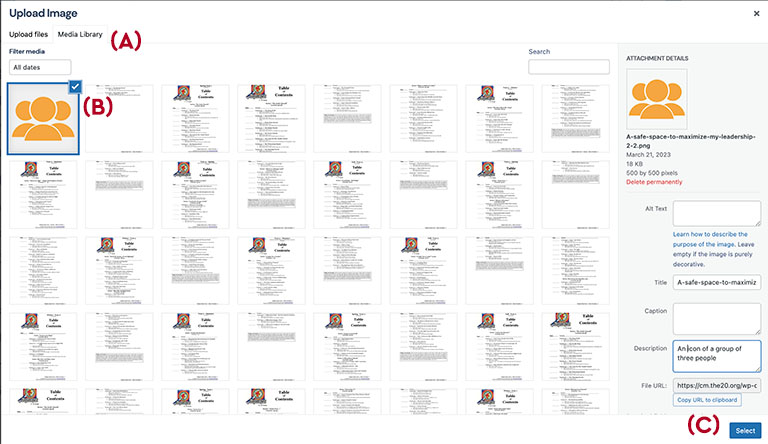
Step 14c: When the image has been added to the media manager, you will be taken back to the Media Library tab (A).  The file you added will be selected with a blue box indicator (B).  It is a best practice to add a descriptor text in Description box (C).  The description is used to guide the visually impaired. Choose the "Select" button (D) to add the image.

(click to zoom)

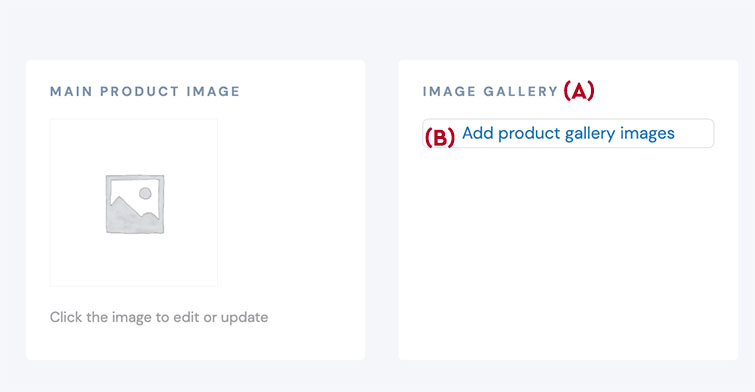
Step 15a: The Gallery Images (A), are the thumbnails that provide additional information about the product.  The gallery is also created through the media manage.  To begin, select the "Add product gallery images" option (B).  The media library will open.

(click to zoom)

Step 15b: Select the "Upload Files" tab (A)  on the window that popped-up when you selected the Add product gallery images.  Either drag and drop or use the select files button (B) to add the images to your media manager. Yes, you can add multiple images at the same time to the media library.  When you have the files you wish to include in the gallery, select the "Add to gallery" option (C).

(click to zoom)

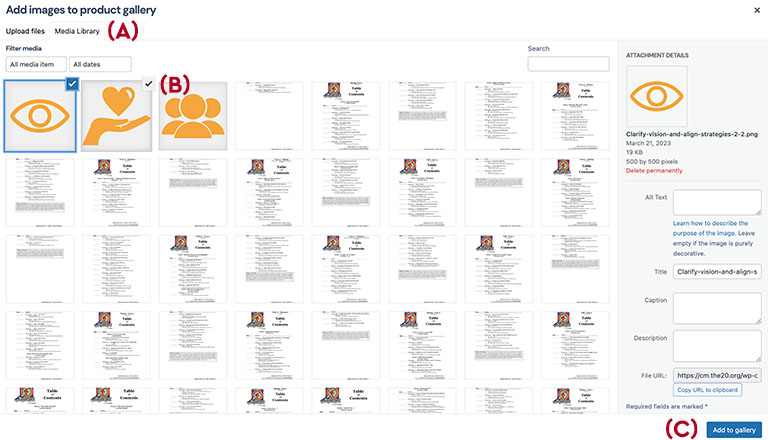
Step 15c: When the files are uploaded, you will be taken back to the Media Library (A).  You will also notice that the files you uploaded now have checkboxes in the upper right corners (B).  The check indicates that they are to be added to the gallery.  You may select other images from your Media Library to be included in the gallery.  When you are done, select the "Add to gallery" (C) option.

(click to zoom)

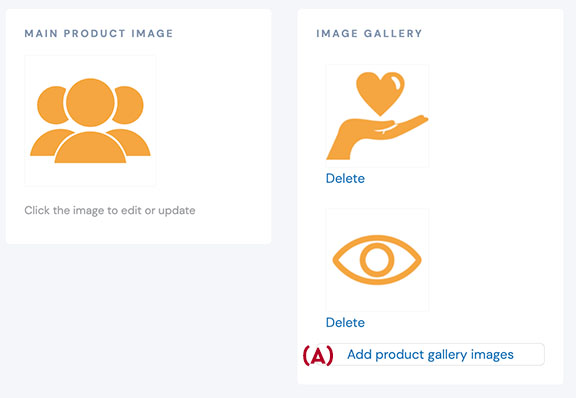
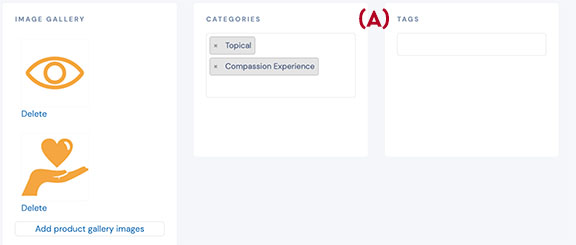
Step 15d: You can select (Click and Hold) on an image in your gallery and drag it to re-order the images in the gallery.  As indicated in button (A), you can add more images to the file.

(click to zoom)

Step 15e: Adding a video to an image.  You can add a video to the image by first selecting the delete image option, (A) and then choosing the "Add product gallery images" (B) option.

(click to zoom)

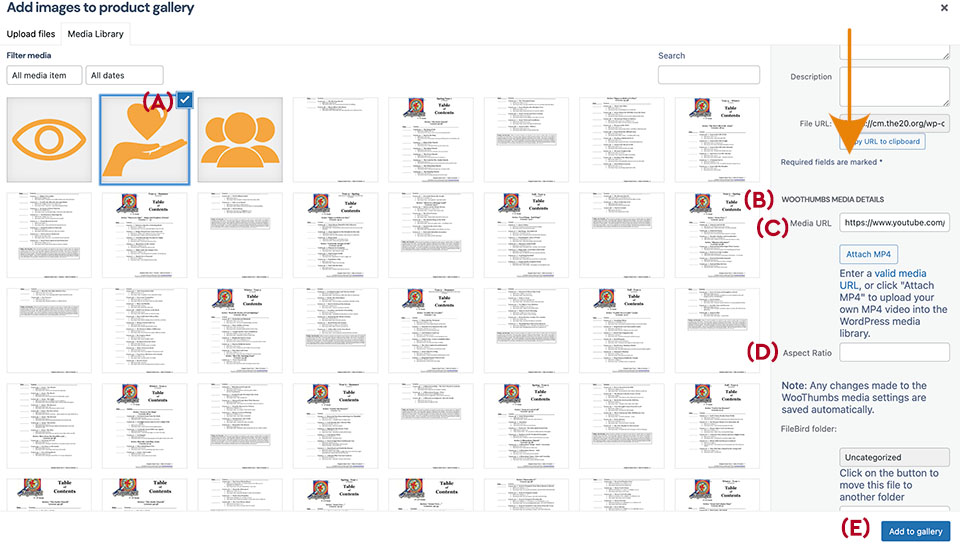
Step 15f: In the Media Library, select the image to which you will place a video (A).  Next, scroll down on the right sidebar until you see the "WooThumbs Media Details" option (B).  Paste the video link in the "Media URL" option (C).  You may change the aspect ratio (D) the default is 1:1. You may also choose 16:9 for a widescreen format.  You will note that there is an option to load your video to our server.  We would ask that you not use that option. Streaming videos from our server will slow the experience down for everyone.  If you need help hosting videos, contact our support team and we would be glad to add it to our Vimeo account.  When you are done, you will want to select the "Add to gallery" option (E).

(click to zoom)

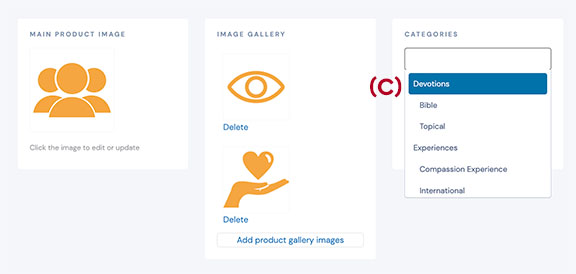
Step 16: You will want to select the "Category" or "Categories"(A) in which you believe the product listing should appear.  We keep a category map which can be found here.  The category map is updated regularly.  If you don't see a category that matches your listing, send us a request to add a new category.  You can use the closest match of a category for now and change it when the new category is added. You may have multiple categories.  We reserve the right to move your product, if we believe it is not in the proper category.  To add a category, select the field (B) and the system will provide a dropdown list (C).  Note that the categories are nested from general category to more specific.

(click to zoom)

Step 17: Tags (A) are a more informal way of collecting similar items together.  Categories are used for navigation, tags are not.  Therefore, it is helpful to include your brand as a category or a series title.  Tags are used for product grouping.  Other than the inclusion of your brand, you might want to leave this empty until you have a sense of how you can help your customers make decisions about your listing.  If you don't see a tag that matches your listing, send us request to add a new tag.  Adding a tag is the same process as adding a category.

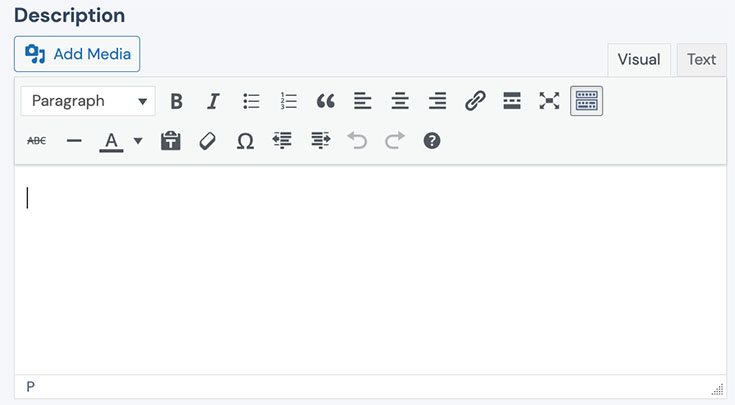
Step 18: The description portion of the listing consists of the text that describes your product or service.  Note that in the listing it is possible to include links, images, and even videos. The product listing should include the following information:

  1. Description of the product
  2. The unique "selling" proposition
  3. Features of the product
  4. What's included in the purchase?
  5. Warranty information
  6. FAQ section

We do have samples that can be used for templates.  You will find them in the shop owners support section of Concordia Marketplace.

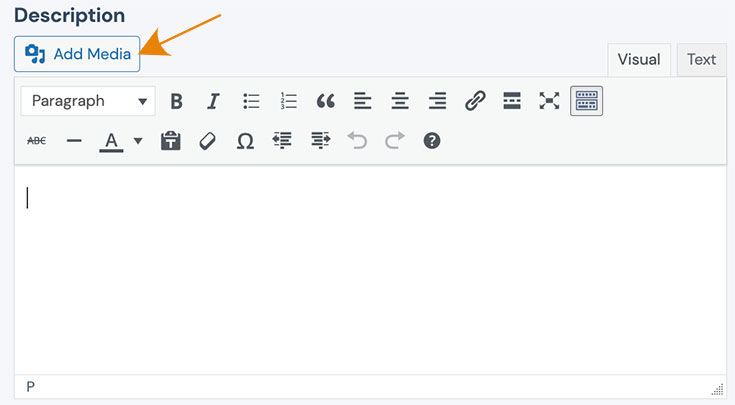
Step 18a: The first step in adding the music listing is to select the "Add Media" button.

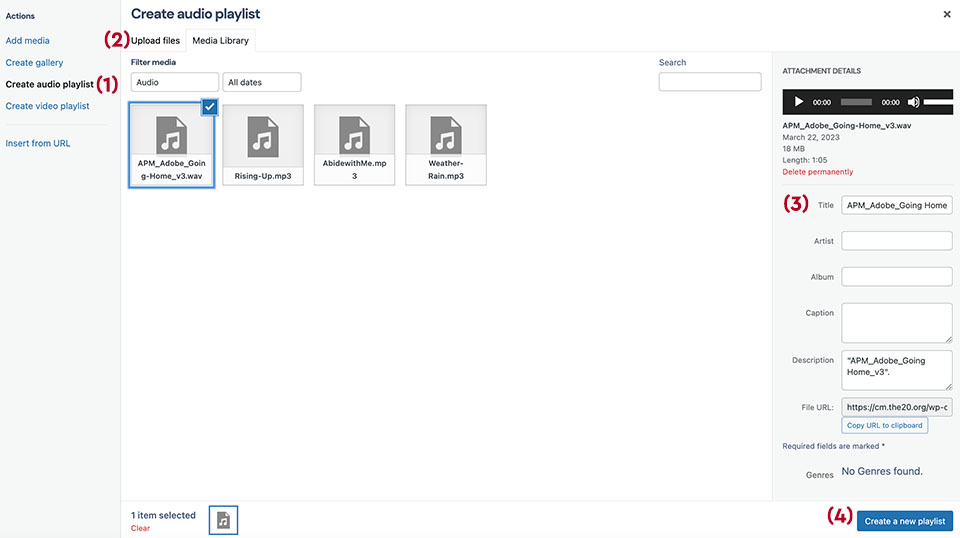
Step 18b: The media manager will open and you will want to select the "Create audio playlist" (1) option.  When you've made the selection, the media library will hide all but the audio files that are in your media library.  If you do not have any files, you will need to select the Upload Files (2).  You can select the button to browse to the the files or drag and drop them on the window.  The system will automatically upload the files to the media manager.  Once the files are in the Media Library, select the audio files that you would like to have in your playlist. When you select the files, you will be given an opportunity to add information about the file on the right information panel (3).  If the music was produced for publication, the fields might be filled in from the music file. The audio files will appear in the list in the order in which they are selected.  When you are done, choose the "Create a new playlist button (4)

(click to zoom)

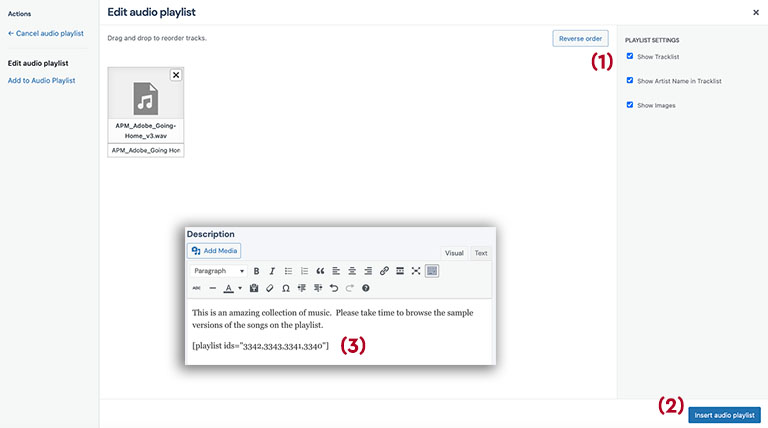
Step 18c: When you have selected the "create a new playlist" the right information panel (1) with present you with three options.  The Tracklist is the listing of the music tracks.  If you select one song to display, you will want to uncheck the "Show Tracklist" option.  The "Show Images" are the images attached to the music file or the default image for the product.  When you've chosen the options, select the "insert audio playlist" (2) and the playlist code will be pasted into the product description.  See the inset image (3).

(click to zoom)

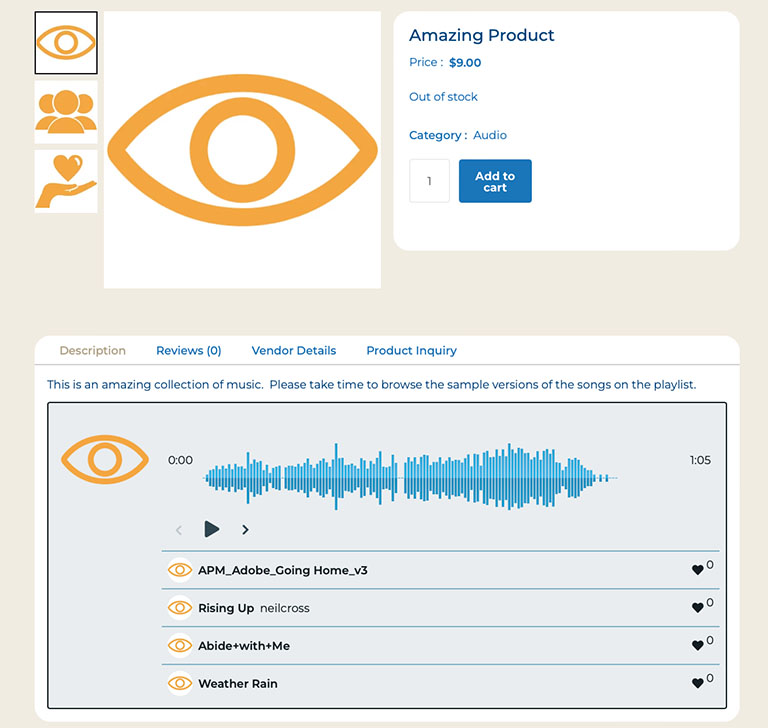
Step 18d: The product list with the music tracks will look like the display to the right.
The music in this particular playlist did not contain image files, so the products displayed the same "Featured Image."


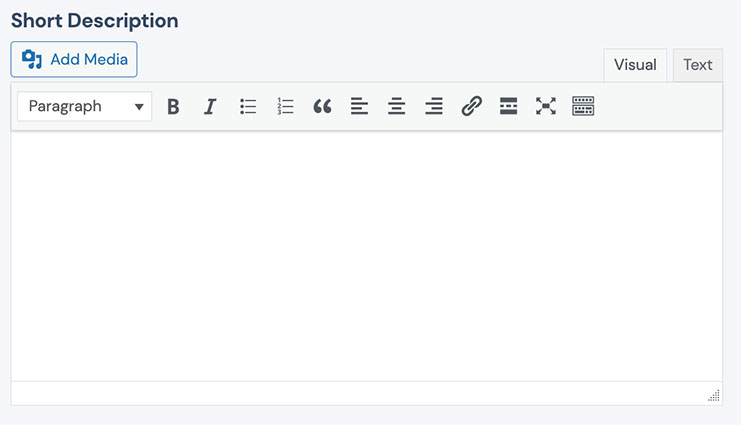
Step 19: The Short Description portion of the listing is generally the first paragraph of the Product Description.  It shouldn't be longer than 85 words.  The Short Description is used in products presented in list form and in the pop-up quick view.

Step 20: When you are done, you will need to scroll to the top of the page and select the "Save New Product" option.