The Toolbar 101

The tool bar is used to edit the product descriptions on Concordia Market.  It provides a robust collection of tools for creating a powerful product description or telling a compelling story. Some of the tools require a multi-step/screen description.  In an attempt to provide readability, A multi-step tool will start and end with a divider.  The index to the right can be used to navigate to a specific feature description using the number of letter label from the toolbar image.

Quick Navigation Links
    Add a header to begin generating the table of contents

    Tool A

    (A): Add Media Upload Tool

    The Add Media Upload Tool is used to add images and video to text content.  We have a different tutorial describing the Media Manager.  This tutorial will provide a surface understanding.

    Select the "Add Media Button"(A)

    The Media Manager window will open.  Note the following features:

    A- The media files current in your account.

    B- The Upload function allows you to add media files.  Media files can be almost any type of document.  Files ending in .exe are not permitted.

    Before you insert the image into the post, scroll the far right sidebar to the bottom for additional options.

    The bottom right column offers three options for displaying the media in the page.  The first option determines the item's alignment on the page.  The second item determines if the file will be clickable and if it is, what the click does: open a file, go to a webpage, play a media file.  The tool can turn any image into a type of button.  The third option determines which file size to use on the page.  It is best to leave the image set to large, unless the image file size is too large.

    Use the "Insert into post" option to add the image.

    If you select the image in the editor, you will see that it displays handles that can be used to change the display size of the image.  (It won't change the file size).  It also offers wrap around text options.


    C- Create a Gallery.

    A Gallery is a collection of images.  When you select that option, a media window opens and you have the opportunity to select the images that you would like to see included in the gallery.  Each image you've selected will have a check-mark (A) and the list of your items will be shown as a list at the bottom of the window. (B)  The items will appear in the gallery in the order in which they are selected.  Once you have completed the gallery, you will select, the "Create a new gallery"(C) button in the lower right corner.

    (click to zoom)

    D- Create audio playlist and Create a video playlist

    A the audio or video playlist is a list of music or videos.  Both tools function identically. When you select the option a playlist builder window will open.

    (click to zoom)

    When you select the playlist option, a media window opens and you have the opportunity to upload music or video files that you would like to see included in the playlist.  Most audio and video file formats are accepted.  AIFF and m4a files are not permitted.  Please note that streaming music files consumes a great deal of bandwidth. If you would like to post more than 10 music files for streaming, contact us to arrange a streaming page for you.  Video files are even more draining.  We request that you only upload 10 videos that are less than 10 minutes in length.  Each file you've uploaded will have a check-mark (1) and the list of your items will be shown as a list at the bottom of the window. (2)  The items will appear in the gallery in the order in which they are selected.  Once you have completed the gallery, you will select, the "Create a new "playlist"(3) button in the lower right corner.

    (click to zoom)

    F- Upload from URL

    This option allows you to insert media files, images, audio, and video from URLs.  This is the preferred method of adding music and video because it burdens the site's server with the streaming process.  Select the option (F)

    (click to zoom)

    Use the field (A) to add the file URL.  Field (B) is to be used when the link does not contain an album cover.  In the example, the link has an album cover which will be displayed on the website.  Select the option to "Insert into post" when the file is done.

    (click to zoom)

    Tools B-C

    (B) & (C): Visual and Text tabs

    The two tabs on the far right, determine which editing environment you will use.  The Visual is on by default and contains the editing tools.  The text option (C) is a code editing environment.  You use HTML and CSS to edit the content.

    (click to zoom)

    Tools 1-5

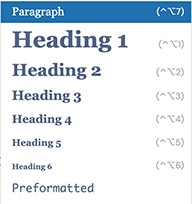
    (1) Is the text format options from the template.  This is where you determine the type characteristics you will apply to specific text.  The image to the right shows the options currently formatted by the template.

    (click to zoom)

    (2) Enables you to format the text as (B)old or (I)italics.

    (3) Enables you to formate a series of lines as ordered and unordered lists.

    Ordered:

    1. Unlock the door
    2. Adjust the seat
    3. Adjust the mirrors
    4. Start the motor

    Unordered

    • Apples
    • Oranges
    • Pears
    • Grapes
    (click to zoom)

    (4) Formats the text as a quotation.  Examples:

    Lacus non tempor? Venenatis euismod eni ut fames volutpat sollicitudin dis mi pulvinar nascetur duis enim. Congue lorem scelerisque iaculis.

    (click to zoom)

    (5) Sets the paragraph alignment

    (click to zoom)

    Tool 6

    (6) Is the link tool

    To use the link tool

    1. Select the text or image to be used as a link.
    2. Choose the link tool (6).
    3. Type or paste the link in the field.
    4. Select the Blue arrow to insert the link.

    The gear icon next to the blue arrow provides more options as shown in the inset.

    1. In the options window you can enter the URL and enter the text for the link
    2. The check box below the "Link Text" field indicates if the link will open a new window.  Generally, links away from the website open in a new window.
    3. You can also use the search box to locate a webpage or item on the Concordia Market website to make link to another item in the store or a web page.
    4. Don't forget to add the link to select "Add Link"
    (click to zoom)

    Tools 7-9

    (7) Inserts a piece of code into the listing that hides the text that follows and provides the reader the opportunity to "Read More."  The effect only works in display environments that can read and interpret the code.  That is found only in the post environment in Concordia Market's website.

    (8) Opens the editor into full screen mode.

    (9) Toggles between the focused editor and the complete editor.

    (click to zoom)
    (click to zoom)

    Tools a-j

    The third line is about text manipulation.

    (a) formats the text with a strike through format

    (b) places a divider on the page.

    (c) allows you to select the font color.  The default colors are not great, but selecting the custom option allows you to use your brand's color pallet.

    (d) is a toggle that when it is turned on will strip the formatting from the text you past into the content box.

    (e) erases the formatting of the text.

    (f) opens a palette with special text characters that may be used in the page, for example the trademark sign: ™

    (i) provides the "undo" option.

    (j) is not always available.  When it is, it offers keyboard shortcuts to all the options.

    (click to zoom)
    (click to zoom)