Adding A Coupon to Concordia Market

Table of Contents
    Add a header to begin generating the table of contents

    Every seller on Concordia Market has the ability to create "coupons" or "discount codes" that can be shared with the customers to be used in the check out process.  The coupons are created and managed through the Vendor Dashboard.

    This tutorial will focus on the Coupon Tool.

    Step 1: Select the Coupon tab

    Select the Coupon tab on the left side bar of the Vendor Dashboard.

    Step 2: Add New Coupon

    When the coupon list opens, you will want to select the "Add New" to create a new coupon.

    Step 3: Complete the "General Tab"

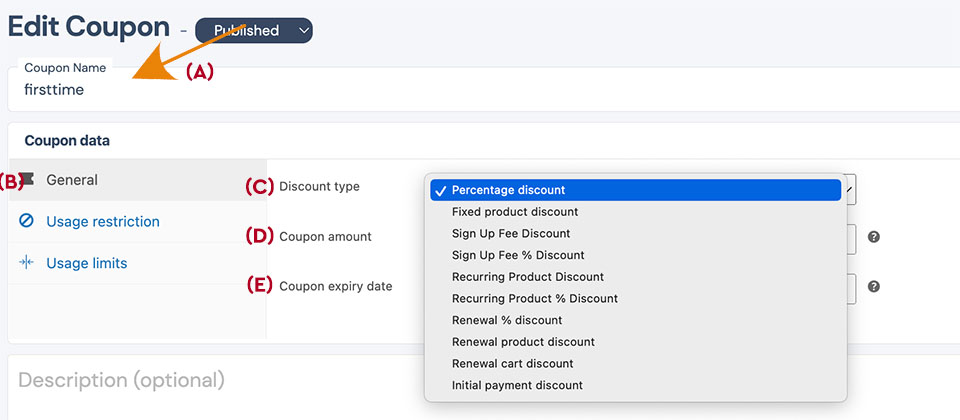
    A) Before completing the general tab of the coupon tool, provide your coupon with a "name."  Note, however, that the name is the actual code that you will provide your customers.  It should only be one word, and might include numbers; for example, "SUMMER23", "FirstTime", or "School23".

    B) Select the "General Tab."

    C) Determine the type of discount that will apply to the code.  The most common is the Percentage Discount.  As implied the discount will give the user a discount off the normal price of an item.

    D) Coupon Amount is the line that you enter the amount to be discounted.  In the Percentage discount the number represents the percentage discount; for example, enter "10" for a "10%" discount.

    E) Use the date picker to select the expiration date of the coupon.

    Step 4: Set Use Restrictions.

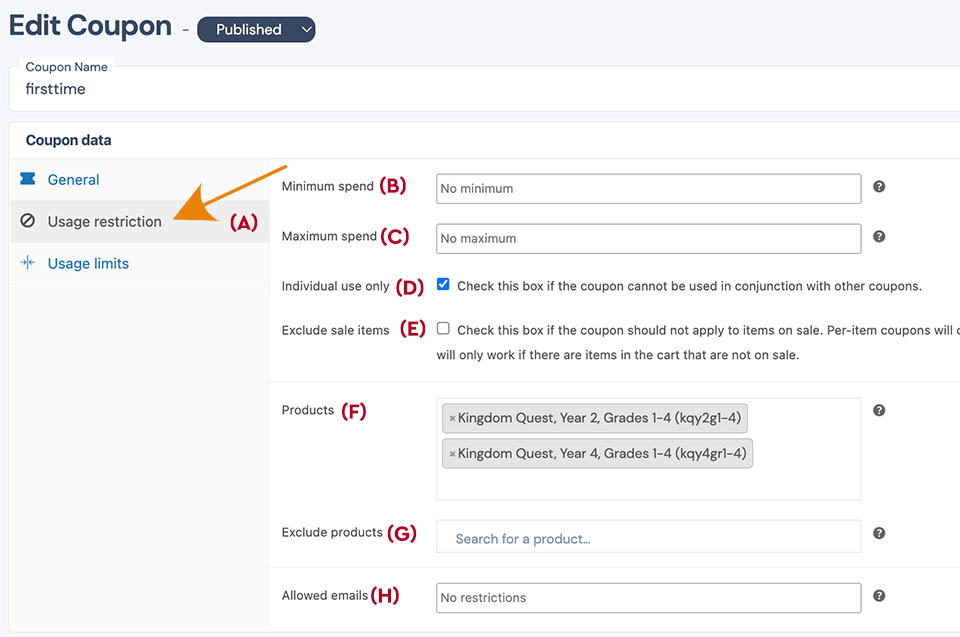
    A) Select the "Usage Restrictions"

    B)  Use the Minimum amount needed to be purchased by the customer before the coupon would be valid.

    C)  Use the Maximum that could be purchased and still qualify for the purchase,

    D) Check this box if the coupon cannot be combined with other offers.

    E) Check this box if the coupon is not to be used with items on sale.

    F) This is the biggest weakness of the tool, you cannot leave this blank.  So, for the coupon to work, you need to list all the products to which it applies.  If you wanted to give someone 10% off any item in your store, you would need to list all the items in your store.  To do so, select the field and begin typing the item's name.

    G) This field is used to enter the items that are specifically excluded from the coupon.  As with field (F), select the box labeled, "Search for a product" and begin to type the product's name.

    H) Allows you to prevent specific people, or emails from using the coupon.  It is possible to block and entire domain by using the "*" wildcard symbol.  For example, "*@gmail.com" will prevent any gmail user from using the email address.

    Step 5: Usage Limits

    As implied by the name, the usage limits tab (A), limits how often the tab can be used.

    B) Limits how many times the coupon can be used by all users.

    C) Limits how many items can be covered by the usage.

    D) Limits how many times a user can use the coupon.

    Step 6: Add a Description and Update Coupon

    You may enter a brief description of the coupon code in the description box (A) and then select the "update coupon" (B).

    Step 7: Using the Code

    To use the coupon, the Vendor would provide their customer access to the code (A) via email, message, or a website.  The Usage field (B) would indicate the frequency of use.  The coupon may be deleted by selecting the three "..." (C).