logo and Title

Adding Physical Products

Creating the Product Listing

Note the Following:

  • Concordia Market is currently designed to offer two types of products, physical products and digital media.  This tutorial covers the process of adding physical products.  Any product that is not shipped is considered to be a digital download by the system.
  • It is important to understand the difference between a shop's product catalog and a shop's inventory listing. The product catalog, often called "My Products" in the Concordia Market system, refers to the listing of a product.  It is possible, particularly with physical products to have a product listing that is valid, but lack sufficient inventory to actually sell the product.  The shop owner is responsible to manage the product listing and the inventory.  Both processes look similar in the Concordia Market system, but each has a unique function.  This tutorial addresses both aspects of the Product, the listing and inventory control.
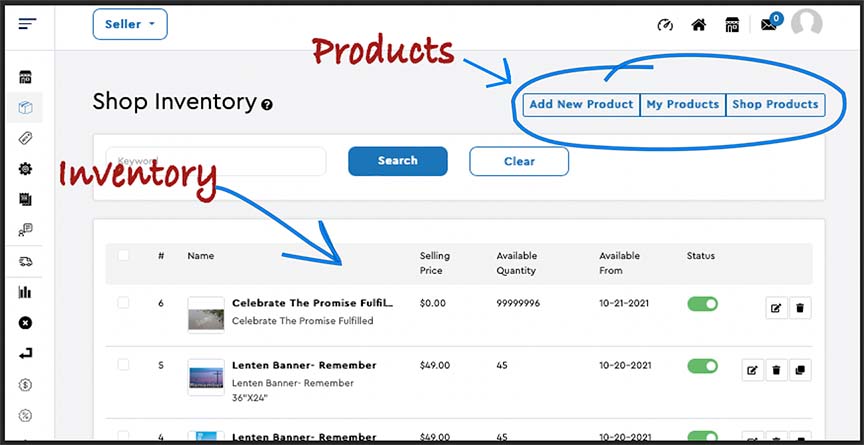
This tutorial explains the process of adding a new product starting with the selection of the "Add New Product" tab found in the shop inventory panel.  You may use the above illustration for reference.

The side tabs permit an easy navigation to the specific step that is of interest of need.
Creating the Product Listing

Initial Setup

Explanation

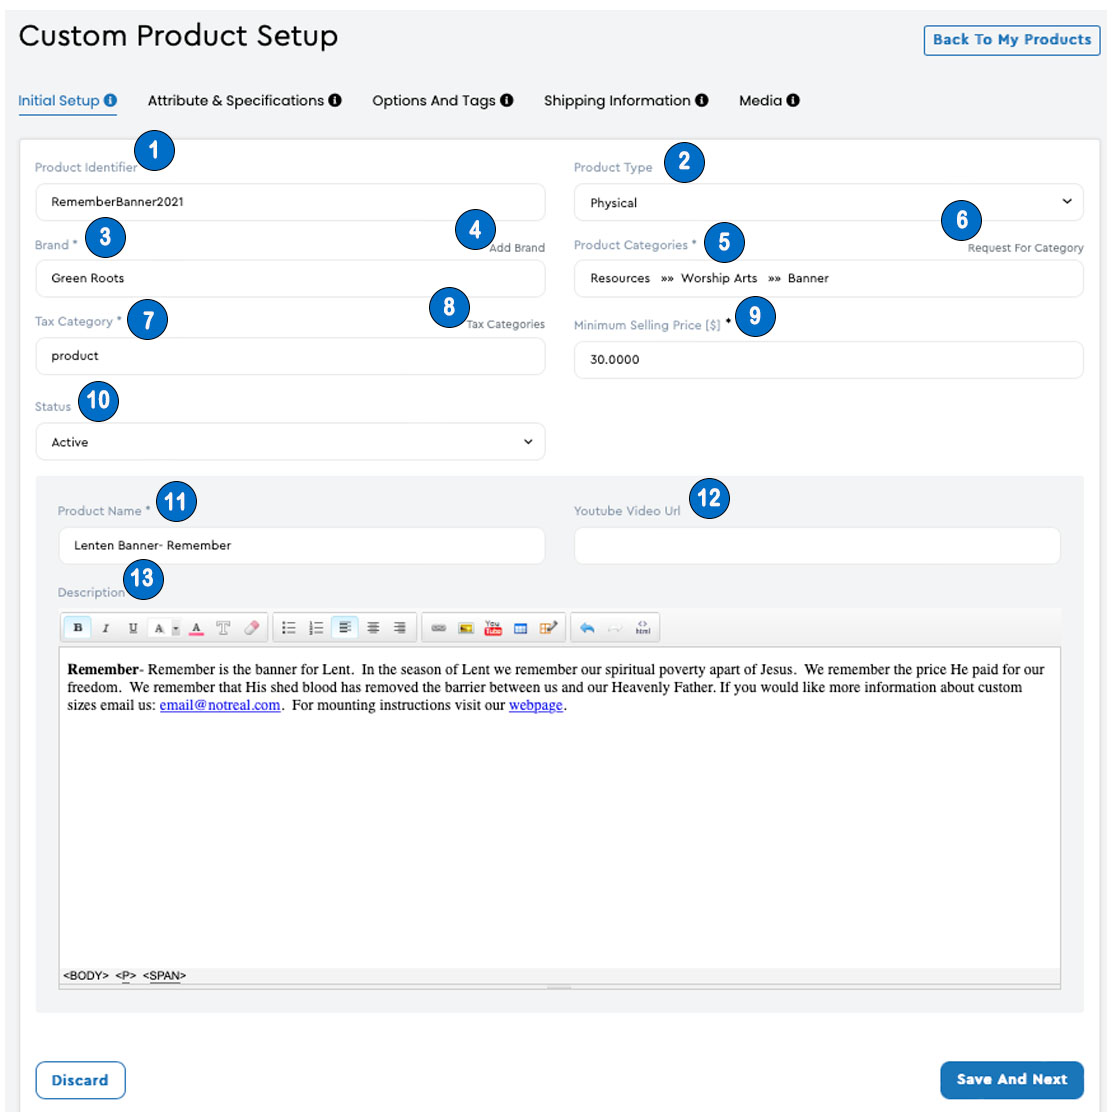
  1. The Product Identifier is used by the system to identify the product.  It is not the name the customers will see when they shop the Market.  It must be unique to from all other products at Concordia Market.
  2. The Product Type is where you select the type of product listing you will be using.  Your choices are Physical or Digital.
  3. The Brand identifies the company or individual that created the item.  For most content creators, the brand would be identical to their store.
  4. If you want to add a brand to the market, select the "Add Brand" link.
  5. The Product Categories are used by the system to organize and cross promote products.  It is essential that you place your products in the proper category to insure that the proper people see your listing.  We have a product category catalog available here or you can begin to type the category based on the product and the system will auto complete the category.  In the example above, the product is a Banner, in the Worship Arts category, listed as a Resource.
  6. If you would like to suggest a new category to category listing, select the link for the "Request Category."
  7. The Tax Category is used by our tax management software to determine the taxes to be collected on a sale.  Our categories at the moment are goods and services.  While digital downloads are not physical goods, they are products and taxed, in most cases like a physical product.
  8. If you want to see the available tax categories, select the link "Tax Categories."
  9. The Minimum selling price sets the bottom limit in which you would be willing to sell the product.  It does not represent the price shown on the from end of the system, but the actual cost of the goods.
  10. The Status is used to determine if the product is available of not available  If the status is set to inactive, the product will not show up in the Concordia Market listings.
  11. The Product Name is the actual name of the product that will appear in the stores listing.  It does not need to be unique.
  12. The YouTube field allows you to embed a demonstration or informational video about the product.
  13. The Description area allows you to post HTML content, including pictures, links, email links, and videos.
  14. Select the "Save and Next" when you've completed the first tab, the Initial Setup Tab.

Attribute & Specs

Explanation

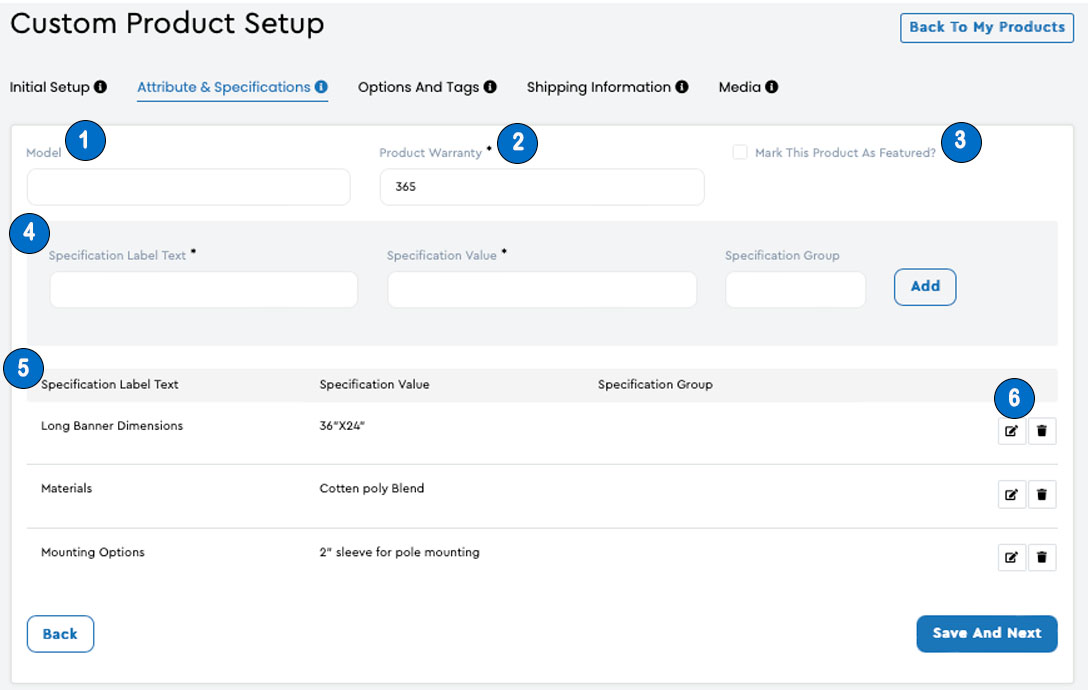
The Attributes and Specification tool allows the shop owner to provide critical information about the product to the shopper.  The specifications may include color, size, weight, materials, or included accessories.  The Attributes may be created in another tool as "groups" allowing for the quick addition of specifications to each product listing.  There is a separate tutorial covering specification groups.

  1. Model- The model applies to manufactured goods that have been given model numbers.  It may be left blank.
  2. Product Warranty- The product warranty may not be left blank.   It is written as a number of days.  In the example above the product is under warranty for 365 days or one year.
  3. Featured products are highlighted in your shop and in the Concordia Market main store.
  4. The grey specification box is used to load specifications into the list at the bottom of the screen.  In the example provided above three specification have already been loaded.  If we were to add a fourth for the wide banner size we would add the descriptor, "Wide Banner" in the Specification Label Text and provide the dimension values 24"X36" in the Specification value.  We would leave the group blank.  When the "Add" button is selected the specifications entered will be transferred to the bottom list and an additional specification can be entered.
  5. The listing shows all the specifications and attributes entered for the item.
  6. The two boxes on the right allow for editing the specification or deleting the specification.

Options and Tags

Explanation:

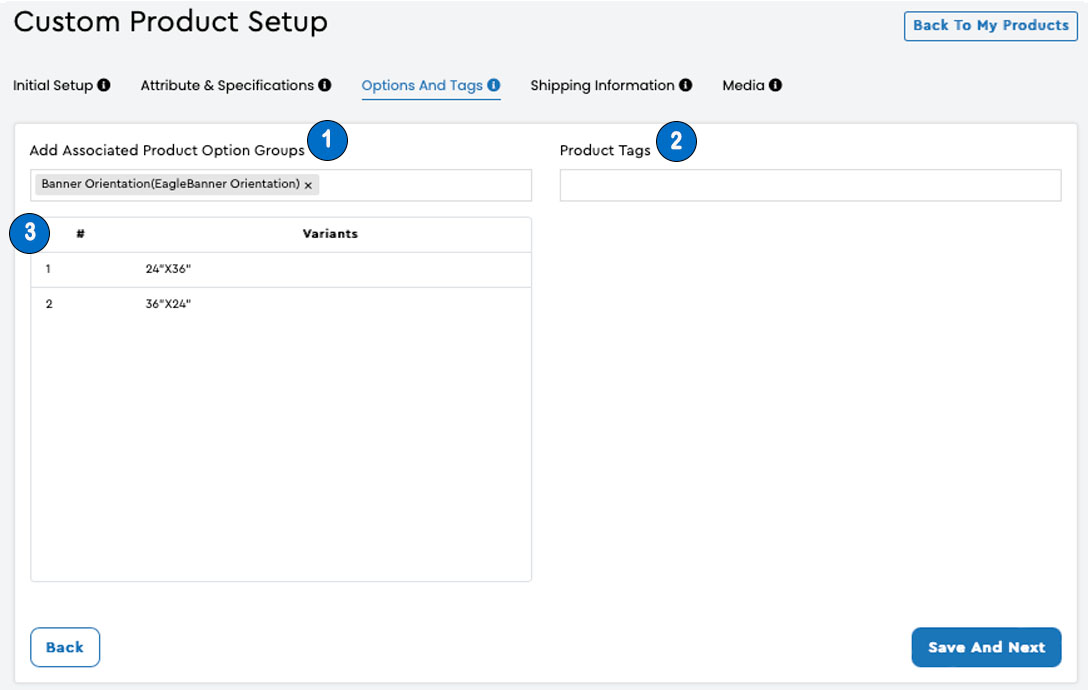
Options allow a product listing to offer variations of the same product.  In the example above, the banner is offered in both wide and tall dimensions.  In clothing listings, product options could be the sizes offered, small, medium, and large.  The options are created in another tool.

  1. Once the Options have been created, the user would begin to type their option's name in the box until the full name can be selected
  2. Product Tags, allow the shop to group supporting items together.  For example, an Advent Banner could be given a tag of Advent Worship Resources, and the banner would appear with other Resources designed for the Advent season.  To enter a tag, just type it in the box.  Separate multiple tags with a comma.  
  3. The product options listings will show all the options available to the shoppers.

Shipping Information

Explanation

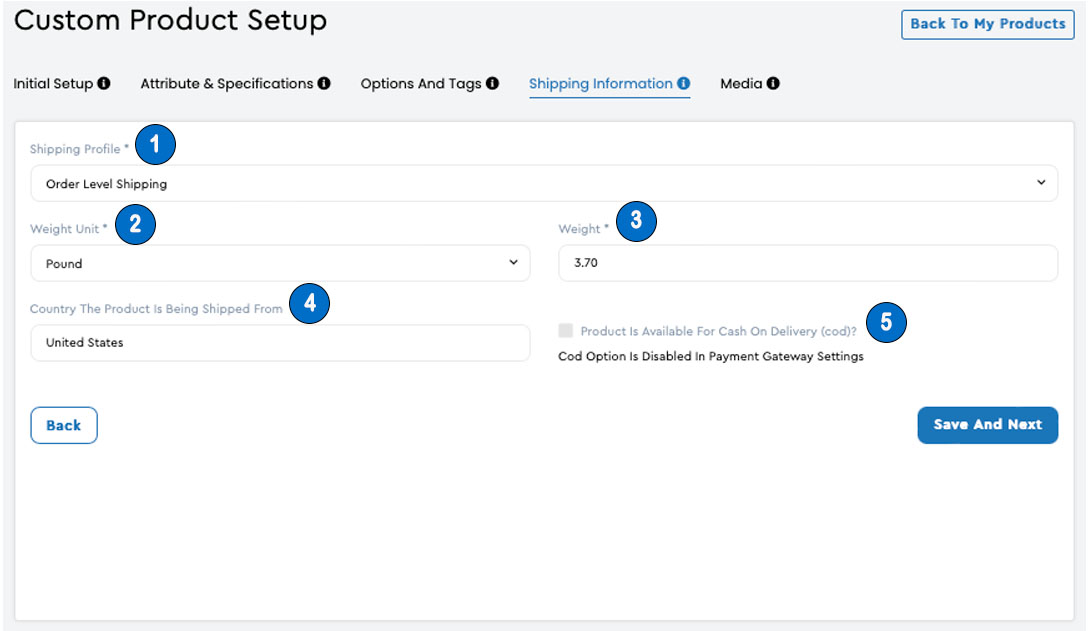
The Shipping Information screen allows the shop owner to provide the information needed by the shipping provider to calculate the shipping costs and delivery dates.

  1. The Shipping Profile is always set to "Order Level Shipping."
  2. The units of measure for the weight of the product is listed as pounds, grams, or kilograms.
  3. The Weight of the product in the unit selected previously is provided.  In the example above, the product weighs 3.70 pounds.
  4. The country information is provided.
  5. Our system is not set to allow COD purchases, so this option is dimmed.

Media

Overview:
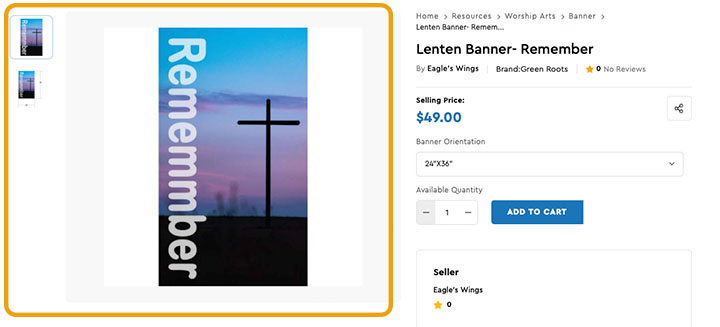
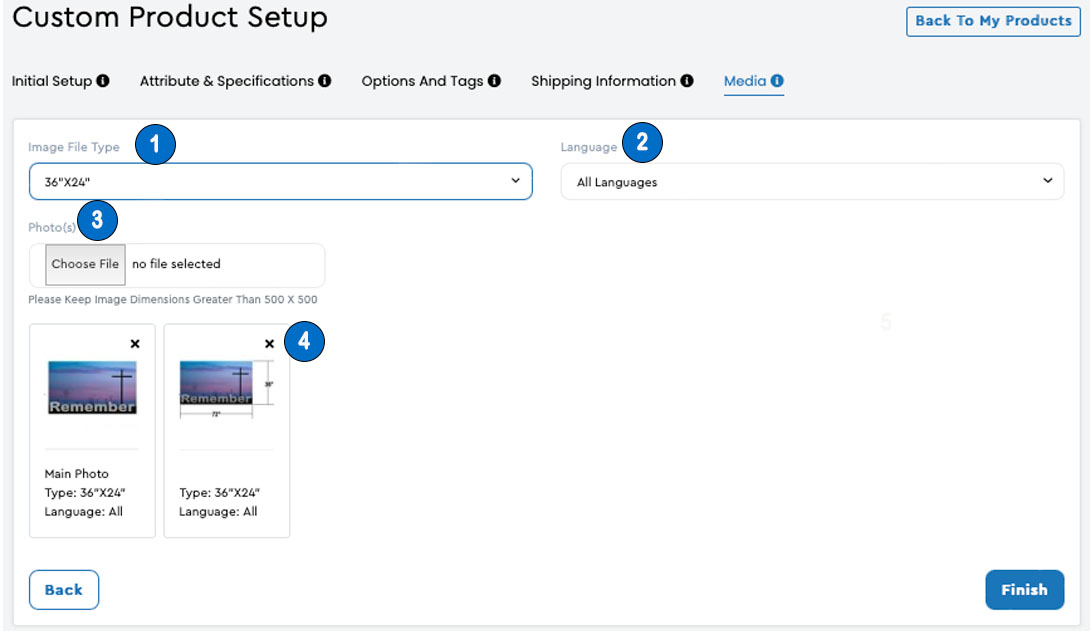
The Media tab is used to upload images for the product listing panel.  In the example below you can see the image preview in the product listing in the store.

The Custom Product Setup tool allows the seller to put critical information about the product in the product listing.

Explanation

  1. The Image File Type is used to vary the images provided in the product listing based on the options selected.  For example, because the wide banner option was chosen in the Image File Type, the wide banner images were added.  To complete the listing, the shop owner would next select the tall banner and upload the tall banner images to provide images for the shopper.  When the shopper changes the option from one size to another in the store, the preview panel will change to match their selection.  Note that if you place an image in the "For all Options" category, it will over-ride the other options.
  2. Note that you can also vary the preview files by language.
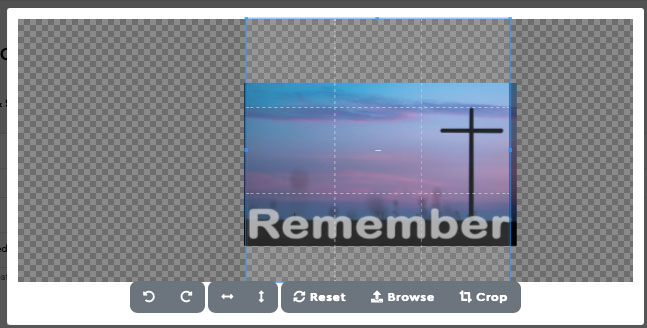
  3. To add the images, select the "Choose File" button, select the image file and choose the "upload" option.  The image sizer tool will open. Make the appropriate adjustments and choose "Crop" to add the image to the list.
  4. The "X" is used to delete the image.

Remember: The new item will not be visible in the store until you complete the second part of the process, adding inventory.